
So you have finally confronted yourself and decided that the big belly plunging outside your trousers must go. You are ready to slog it out to get the dream flat belly. A flat tummy is a dream that is now within your reach! You need no pills, no liposuction surgeries, or any other treatment that is artificial, unsustainable and could potentially harm you in the long run. We are going to share with you a few classic Yoga poses that will set you on course for zero bellies.
Apart from the obvious benefits like a flatter stomach, healthy body, natural detox, Yoga essentially is a harmonious union of your body, breath and the mind. It is one of the rarest holistic practices that combine spiritual and physical benefits, so that you glow on the outside and inside.
We list out some really power pact breathing exercises or Pranayamas and Yogasanas or postures for a flat stomach. A general instruction that applies to all the Pranayamas and Asanas mentioned here in these sequences- the poses should be well synced with your breath. Also to get the most out of these poses and Pranayamas, keep all your attention in your belly region, observing the sensations and movements there.
1) Kapalbhati Pranayama (Meaning- Skull Shining Breathing Exercise)
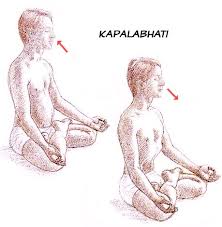
-First of all, sit with eyes closed, keeping your spine erect, hands on the knees, and palms facing the sky.
-Place the right hand on the stomach and then, take a deep breath in and slowly as you exhale, relax your whole body.
-For Kapalbhati, take a deep breath in and as you exhale, breathe out forcefully while pulling the stomach all the way in every time we exhale. You will see, every time you exhale forcefully, the inhalation happens on its own.
-Continue this fast paced exhalations for 15-20 times or according to your capacity, till the body can hold the breath.
-Repeat the cycle 3 times
Kapalbhati is a strongly recommended breathing exercise since it helps to remove all the toxins from the stomach and liver region.
Some Warm Up Exercises To Prepare For Some Yoga Asanas For The Belly1) Sitting Forward Bend
-Sit with legs crossed in Sukhasana or comfortable pose.
-Catch your knees with your hands.
-As you breathe in, lift your head up and look up.
-As you breathe out, squeeze your belly in and slowly bend forward.
Important: Bend from your lower back. Do not bend from the middle of the spine. Bend all the way from the hip joint.
-Stay there and continue breathing for 3-5 long breaths. Every time you breathe out, pull your naval in the belly in and take your mind to the abdomen region.
-Repeat it for 3 times each on the right and left side.
2. Sitting Upper Body Twist
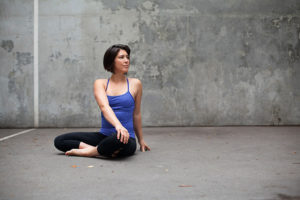
Next, catch your right knee with both the hands, and slowly as you breathe in, look up. In this you naturally twist your upper body slightly towards the right since you are holding your knees with both the hands.
-When you breathe in, look up and when you breathe out, bend forward.
-The effort should be to touch your nose to the right knee and when you bend forward by breathing out, pull your naval in, and take your mind towards your belly.
-Stay there for 2-3 long breaths. Observe your stomach and naval region. Slowly as you breathe in, come up and switch the sides.
-Catch your left knee with both the hands. The upper body will twist to the left side little bit. Repeat the above bend.
Here from this point, we will incorporate Dual Asanas together to get the muscles working towards a flatter belly
3. Cat And Cow Stretch- Perfect Belly Stretch
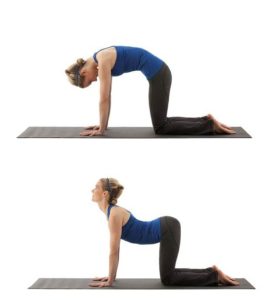
Generally cat stretch is done first and then the cow stretch is done separately, but since we are focused on making our tummy flatter we will do it together while syncing the breath and keeping the mind towards the belly and naval region.
-Come on the knees. Both the knees should be 1-2 feet apart. Align them with the hip joints. Knees and ankles are on the floor, palms on the floor in line with shoulders. The upper body should resemble top of the table.
-Take a deep breath in, look up, push your belly towards the floor, squeeze your shoulder blades, so you expand your stomach completely and then
-as you breathe out, squeeze your stomach in as much as possible. Take your chin to the chest and roll your upper spine in the shoulder blade area.
-Repeat the stretch 5 times.
Syncing All The Limbs
In a variation of the cat stretch, let us do it by syncing the legs and hands together.
-When you breathe in, look up, push your naval towards the floor and lift your right leg all the way back, stretch it back and
-lift your left hand all the way in the front, parallel to the ground.
-Then when you breathe out, make a fist with your left hand, bend your left elbow, and bend your right knee.
-Take your left elbow and right knee towards your stomach, squeeze your stomach in as you breathe out and take your chin to the chest.
This has to be repeated with right leg and left hand 5 times and then with left leg and right hand another 5 times
4. Child Pose Or Balasana And Camel Pose Or Ustrasana
For the child pose,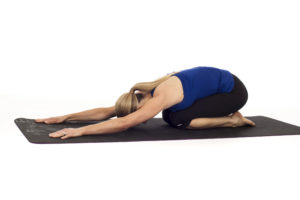
-bend your knees and bring them to the floor along with your ankles.
- The hips are resting on your legs, your thighs are resting on your legs and your chest is resting on your thighs, your arms are stretched out, and
-slowly take your arms to the sides of your body, palms facing the ceiling. This is the starting point of the sequence of child pose and camel pose.
For camel pose
-While in child pose, slowly as you breathe in, lift your arms up by the sides,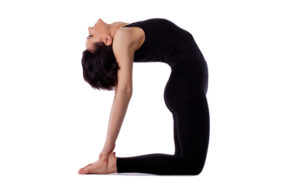
-slowly lift your body up, come on your knees, look up and then
-take your arms down all the way back towards the body.
- Interlace your fingers, chest out and then look up.
-And then slowly as you breathe out, squeeze your belly in, and take your chin to the chest and slowly lie down once again. Repeat the entire sequence of both the asanas 5 times
5. Upward Facing Dog Or Urdhvamukha Shvanasana And Downward Facing Dog Or Adhomukha Shvanasana
-Come into plank position or Dandasana. Here, both the palms on the floor aligned with both the 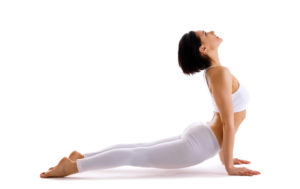 shoulders, both the toes on the floor. So your whole body is in a single line.
-From your heels to the shoulders, it should look like a single alignment, approximately 30 degrees from the floor and
-Also, your eye gaze is on the mat on the floor and your palms are in line with your shoulders.
-When you breathe in and breathe out, bend your elbows, drop your body down and then
-slowly as you breathe out, stretch your body slightly forward and lift up your body completely on your palms and on your ankles and look up. So your body makes a curve from the toes to top of your head, into an upward facing dog and then
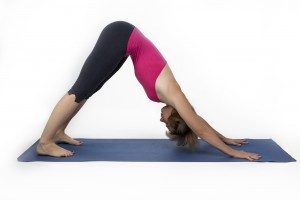 -slowly as you breathe out, come down, the upper body goes down and then lift your hips up, lift your whole body on your palms and on your heels. Come into the downward facing dog position.
-Once again as you breathe in, go in upward facing dog and then as you breathe out, downward facing dog.
-When you exhale, squeeze your stomach in, take you mind towards the belly region and then go in downward facing dog. Repeat this cycle 5 times. Finally, relax in child pose.
Sit comfortably with legs stretched out in front of the body, knees are straight and then let us get ready for the next pose. Importantly, between the stretches, observe the relaxation in the body because this gives you the real rest while strengthening the regional muscles.
6. Paschimottanasana Or Seated Forward Bend And Purvottanasana Or Upward Plank Pose
-As you breathe in, hands by the sides go up, biceps touching the ears, stretch your arms up and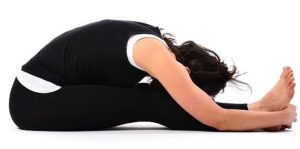
-as you breathe out, squeeze your belly in and slowly bend forward trying to catch your toes or ankles, wherever possible. Stay there for a couple of breaths.
-Slowly as you breathe in, come up, bringing your arms up with your biceps touching your ears.
-And as you breathe out, place your hands by the sides of your body all the way back on the mat.
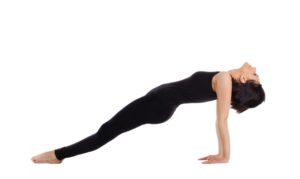 For Purvottanasana, as you breathe in, lift your body up on your palms then on the toes.
-Slowly as you breathe out, come down and as you breathe in, hands by the side, repeat Paschimottanasana. Repeat this cycle 5 times.
7. Yoga Nidra
Finally, having felt the stretch in the abdomen and all other parts of the body, now it is time to rest and let the body cells relax. It is very important that after doing asanas, we either finish the session with a guided meditation of Yoga Nidra (Yogic sleep). It is important to know that, without proper rest after the asanas, you miss out on the most important experience of Yoga which is a deep spiritual rest that your body gets, after having exhausted the Rajas Guna in the body through focused activity.
(With inputs from Jai Desai, a Sri Sri Yoga corporate trainer for over a decade)
Disclaimer: This article is only for informational purposes. It is strongly recommended that you learn and practice these Asanas under the guidance and supervision of a trained and certified Sri Sri Yoga faculty.
Picture Credits
1. Kapalbhati www.insayoga.com
2. Seating upper body twist www.livingwellmindness.com
3. cat-cow stretch www.backpaininfo.co
4. child pose www.healthnbodytips.com
5. Camel pose www.lovemyyoga.com
6. upward facing dog www.kristinmcgee.com
7. downward facing dog www.yogaisoneness.com
8. Paschimottanasana www.sarvyoga.com
9. Purvottanasana www.augustyoga.com


